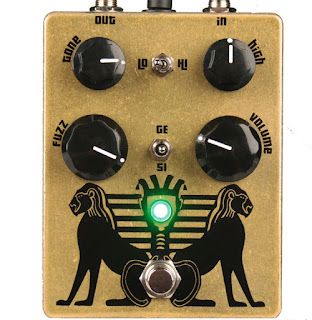
I want to make Big Muff variants using my Coda Effects Big Muff PCB, and show you how to make them yourself. Lets start with the boutique version of the Big Muff that made it popular again on the stoner / doom scene: the Pharaoh Fuzz! Produced by Black Arts Toneworks since 2011, it was an immediate success because of the huge, warm, doomy sounds it can produce.
Here is my version:

As you can see, the Pharaoh has more controls than a classical Big Muff. There are the classic gain / volume / tone controls, like a classical Big Muff, plus a few other options. Here is the original version of the Pharaoh:

There are a "high" potentiometer that allows us to set the amount of trebles, and two switches. The first switch is a 'high / low' switch, that allow us to have 2 types of gain settings for the pedal: low gain and high gain. It modulates also a bit the trebles. Finally, you can choose the type of diodes in the last distorsion stage with the second switch: classic silicon diodes, no diodes or germanium diodes!

Finally, there are some modifications on the circuit. For instance, input and output capacitors are 10uF tantalum capacitors, which will let a looooot of bass go through the circuit!
Here is a gutshot (yes, I had fun drawing this!):

You can see the tantalum capacitors that are drop-shaped. I try to avoid as much as possible to use it in my guitar pedals. They are not especially good for audio, expensive, and most of all there are not really "ethical friendly". Tantalum is produced from coltan, a mineral that is the root cause of many conflicts, especially in Congo. Illegal mines were opened without any regulation, degrading environment in an uncontrolled way, with many Human right issues (a bit of reading about that on wikipedia). Traceability is a big problem with electronics. Most of the time we do not know how, where or in what ecological context components are made... For tantalum capacitors, just know that they are easily replaceable by electrolytic capacitors.
Wima capacitors are much better for that: they are made in Germany (and thus, their production must respect European ecological laws and regulations). This is why I try to use them as much as possible:

Here is the schematic from the Big Muff page:
As you can see, it is very similar to the Big Muff circuit! We can use the Coda Effects PCB and modify it following the above schematic. Here are the modifications to do:
- no mid knob, 470k for R5.
- no R2 resistor (we will use a switch instead)
- no D1/D2 diodes (switch here too)
- no R8 resistor. (replaced by a "high" potentiometer)
No big changes!
If you want, Rullywow sells a PCB especially conceived to make the Pharaoh Fuzz, named "King Tut". If these mods seems a bit difficult to do, you can buy this PCB to make it easier ! Rullywow creates really nice PCB, and this one is no exception, and is of very nice quality.
First, we will remove the mid knob by placing jumpers on the mid knob pads, like indicated on the build document.
To include the switches, we will have to use a 125B enclosure, it will not fit in a 1590B. We will have to use long lugs potentiometers to place switches so they do not touch the circuit board and create false contacts.
For R2 and D1/D2, we will use switches:
- SPDT on-on for choosing R2
- SPDT on-off-on to choose D1/D2 diodes.
Choosing R2: switching between the Hi/Lo setting of the Pharaoh
We use a "on-on" SPST. Signal arrives to the center of the switch, and goes through a resistor, 39k ("high" setting), or 390k ("low" setting):
It can apply to any resistor in the circuit, so feel free to experiment! Of course, some resistors are more interesting than others... I let you try!
Diodes choosing: 3 positions switch
We will use the same system for the diode switch. We are going to use a 3 positions on-off-on SPDT switch in order to have: germanium diodes (3 to have assymetric clipping), no diodes or classic silicium diodes. The second set of diodes to replace is D1/D2:Treble potentiometer
Last mod to add to have exactly a circuit like the original design: the treble potentiometer. In fact, you just have to replace R8 (tonestack resistor) by a 25k potentiometer. Just connect the lug 1 and 2 to each pad of the R8 resistor:
There it is! Voilà! We have got our Pharaoh Fuzz PCB!
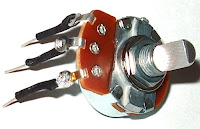
You can solder the other potentiometers now. Beware: if we use "classic PCB-mount" potentiometer, the switches will not fit in the enclosure (they will touch the PCB and create false contacts). We will have to use "long lug" potentiometers like this ones:


You can now drill the 125B enclosure, and rock! :)
Have fun!
To go further:
Official Pharaoh webpage : if you are interested in buying the original pedal
Veroboard version of the pharaoh: a bit annoying and complex to make, but doable!
King Tut PCB: dedicated PCB conceived by Rullywow


4 Comment
Hey! I'm currently putting together a version of this pedal just a quick question. I'm planning on swapping in the tantalum caps at C1 and C2 just curious what factor the polarity matters if I do. Should I use non polarized tantalums or does it matter what the orientation is for this swap?
AnswerHello,
AnswerThe orientation of the caps does matter for this pedal. I will upload a schematic with the correct polarity asap!
Benoit
Hi, Great build photos and tutorial. I am finding that there are two versions of this pedal floating around on the net. One with 47nf coupling and feedback caps (as in yours and Rullywows). And the other version has all caps changed to 470nf. This will make a HUGE difference in the tone of the entire pedal. Have you ever played yours against an original Pharoah?
AnswerThe original pedal uses a sp3t switch for the diodes. They are jumpered in mid position an C7 is in parallel with C11. You could achieve the same with a dpdt on-on-on and a jumper on the switch
Answer